If you are reading this post I am guessing you are a current user of HubSpot or you will be soon enough. As you probably know, HubSpot is a tool where - besides a looot of other stuff - you can build and create blogs, website pages, landing pages, emails, etc. But how do you actually build all these pages? And what about their design? How do you apply it? Well, with the HubSpot Template Builder.
In this article we’ll show you how the Template Builder works, its capabilities, and how to use it. We’ll focus on website pages and landing pages, since the email and blog templates are different and with their own functionality. (We will see them in another article).
And don’t worry! You don’t need to be “techy” to understand what we’ll be talking about here.
| INDEX |
|
- The Perks of the Template Builder |
The Perks of the Template Builder
So, what’s so great about the HubSpot Template Builder?
- As the name suggests, it’s a template builder. That means that you can create several pages based on the same template, so they will have the same structure and style.
- Also, if you make a change to the template, it will affect all the pages using that template. This may seem obvious, yet not all marketing tools have that functionality.
- It is all built with drag and drop modules, so it’s really easy to build a template, and you don’t need to know how to code in order to create a new one.
- Also, there is a marketplace where you can purchase templates (and some of them are free!).
There are many more awesome features to discover, so let’s get to it!
The Design Manager and Its Content
The main tool to create templates with is the Design Manager. To start, we should familiarise ourselves with it.
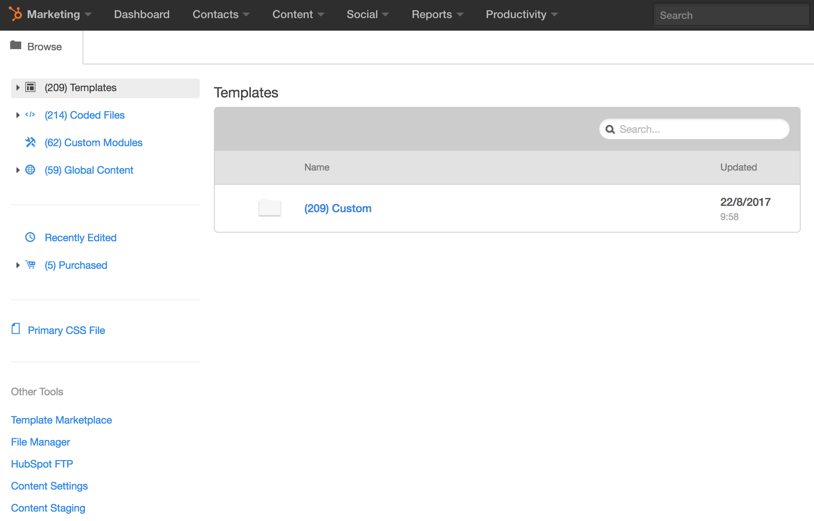
To go there, we need to click on the HubSpot main menu (upper menu) ‘Content’ > ‘Design Manager’.
What you need to focus on in here is the four folders on the left: ‘Templates’, ‘Coded Files’, ‘Custom Modules’ and ‘Global Content’. These are the four kinds of elements that you can build here.

- Templates: create templates with modules so you can produce several pages based on particular layouts;
- Coded files: this is where all the stylesheets are stored;
- Custom modules: another great HubSpot feature! You can create custom modules in addition to all of the modules which HubSpot already offers;
- Global content: these are regular modules that you can make global, so you can use them in several templates. For example, a header or footer.
In this article we will focus on the template sections.
How to Build a Template
Now we are going to explore the Template Builder and see what modules are available.
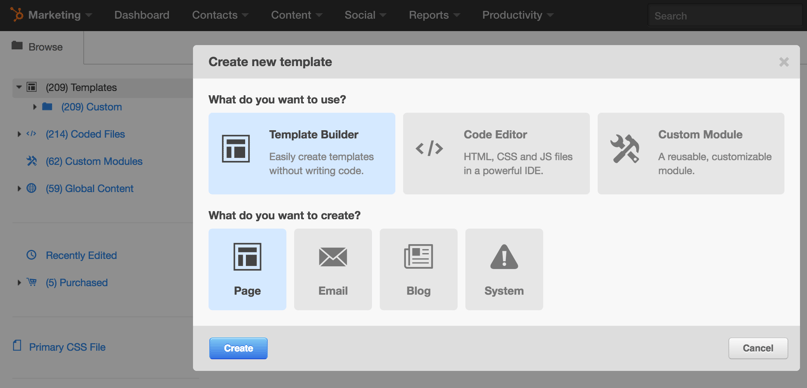
Firstly, click on ‘New Template’. You can create a new template, a new coded file, or a new custom module. (There is no global content here because, as we said, they are regular modules converted to global. We will explain how to convert them later).
Select ‘Template Builder’. You can choose between building a page, email, blog or ‘system’. In this context, ‘system’ refers to producing error pages and subscription preference pages.
For this tutorial, choose ‘Page’.

Next, pick a filename and a folder to save the template to.
The Structure
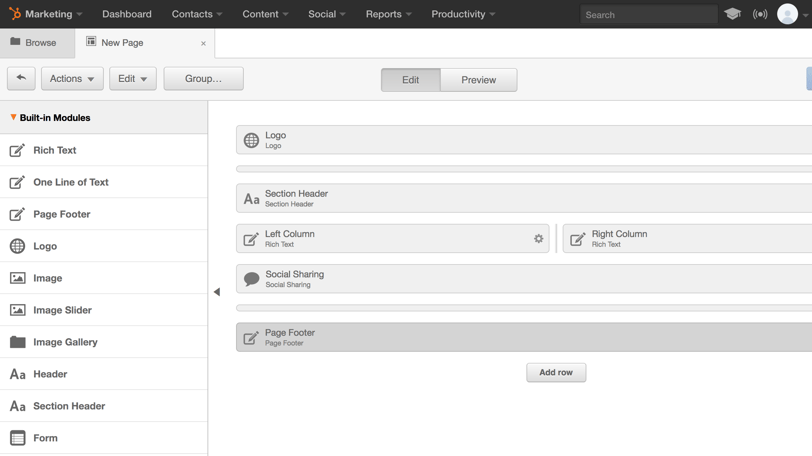
By default, a new template starts with some modules. Also, you will see two lines on the screen. Those are not modules, but lines which separate the header, body and footer. These features are useful for organizing the content and also for beginning with reasonable style choices.
On the left you will see a column with all the available modules ('Built-in Modules'). You will find modules for text, image, code, menus, calls to action, forms, etc..
Below the built-in module, you will find the global groups and the custom modules. All you need to do now is drag and drop the module that you want to wherever you want it to be. You can drop a module below or above another module, or to its left or right.

If you drag and drop a module inside another one, you will create a box with two modules. This configuration is called a module group. There can be as many modules as you want in a group. This is really useful for organization and also for applying the same styles to a specific group of modules.
Another facility which module groups have is that you can convert them into a ‘Flexible Column’ (as long as there is only one column inside the group). That means that when you create a page from this template, you will be able to add modules (each below the other) just editing the page itself (you won't need to modify the template). That way, you don’t have to edit the template, and you can customize one page only.
If you make a mistake and want to go back, don’t worry. You can just click ‘Edit’ > ‘Undo’. Or if you have already published the changes, go to ‘Actions’ > ‘View revisions’, and chose a former version.
To make the module group a “Global group”, you just need to go to the ‘Tool wheel’ and select ‘Make group global’.
You can also make just a single module global.
With global modules or groups, you will be able to use them in several templates, and edit them separately so that the changes apply to all of the sub-templates. (That way, you won’t have to go to each template, and make the same changes several times).
The Content
For each module, you can edit its content by clicking on the ‘Tool wheel’ and then ‘Edit options’. You don’t actually need to edit the content in the template, as you will be able to do so on the page, but if you want to repeat content across several pages, then it is very useful to do so. When you create a new page based on this template, the page will have the content which you entered into the template.
But what happens if you make a change on the template?
That depends on whether the module is locked or not. (You can lock it by clicking on the ‘Tool wheel’ > ‘Lock module’). If the module is locked, it means that you cannot change the content on the page (but only on the template). If you make a change on the template, it will also apply to the page. Yet if the module is unlocked, the changes will not apply to the pages already created, but only for the new ones.
The Styles
OK! Now we have got the structure and the content of our template. But how do we apply styles to it so that it looks as I want it to? There are several ways.
- You could attach a stylesheet (also known as a CSS sheet, which is a file where you write all of the styles) to the template. Just go to ‘Edit’ > ‘Edit head’.
To do this, you may need help from an IT developer, or someone with CSS skills.
For the sheet to work, you need to apply classes to the modules. To do this, go to each module’s ‘Tool wheel’ > ‘Edit CSS declarations’. Like the modules, the template itself also has an option for declarations. On the template, click ‘Edit’ > ‘Edit body CSS’. - Apply the styles directly to the template and the modules.
Just go to each module ‘Tool wheel’ > ‘Edit CSS declarations’. On the second field, you can write styles, for example ‘background-color: red’. You can do the same for the whole template clicking on ‘Edit’ > ‘Edit body css’.
Just remember that on ‘Content Settings’ > ‘Page publishing’ you can add a stylesheet that will apply to all of the pages which you want to style the same way.
The Marketplace
Does that all sound like too much of a faff? Maybe you don’t have the time to create templates, or there’s no-one on your team to help you with the styles. In that case, you can purchase or download free templates from the HubSpot Marketplace.
There you will find many templates (not only for web pages and landing pages, but also for emails, blogs, etc.). These templates are already structured and styled, but often (it depends on the template and its developers) you can customize them quite easily.
Creating a Page
For creating a page based on the template which you are on, go to ‘Actions’ > ‘Create page from template’.
There, you can choose between ‘Landing Page’ and ‘Website Page’. (There is not much difference between them, and the distinction is mainly for the purposes of organization. Indeed, it’s more of a conceptual difference You would use website pages for pages on your site, while landing pages are often more independent without navigation menus, and intended for offers and converting people).
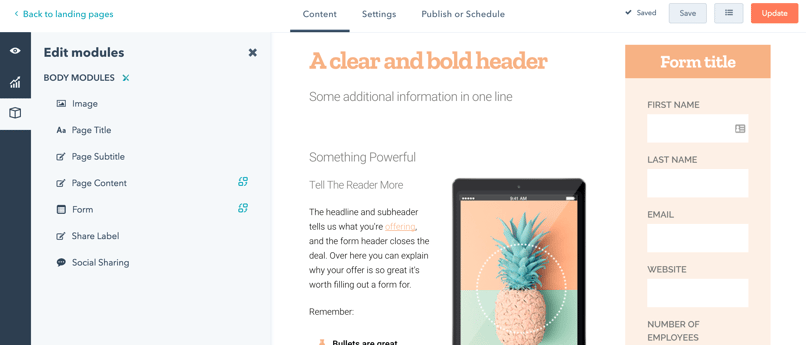
When you edit the page, on the left menu there is ‘Edit modules’. There you can see all of the template’s unlocked modules, which you can also edit on the page.

If you want to change the page’s template, go to ‘Settings’ > ‘Advanced Options’ > ‘Swap template’.
Warning 1! -> If the modules of the new template don’t correspond to the modules of the old template, you may lose some content. For example, if you had a rich text module, and there’s no such module in the new template, you will lose all of the content which you had in the rich text module.
Warning 2! -> You can add a stylesheet specifically to the page (on ‘Settings’ > ‘Advanced options’ > ‘Page-specific Stylesheets’). If you swap your template, this stylesheet won’t disappear, and so you may have styles that do not match with the new template. That means you must make sure to delete the page specific stylesheet.
You can also clone a template in case for example you want the same structure and style, but you want to change the header. Or you might want to add or delete a module. To do this, just go to ‘Actions’ > ‘Clone’.
Of course, there’s much more on the hubspot template builder than what we have explained here. Yet we hope that you now know at least where to start! As you can see, it’s quite easy! But if you have any doubts, don’t hesitate to leave a comment and we will work as best as we can to help you. :)


